Introduction
For the best network connections to your neighbors, the best place to put a wireless router is on the roof of your house or organization's building. Every roof is unique, and this guide cannot cover every possibility. This module covers just a few options. Use your best judgement to decide what method will work best for your context.
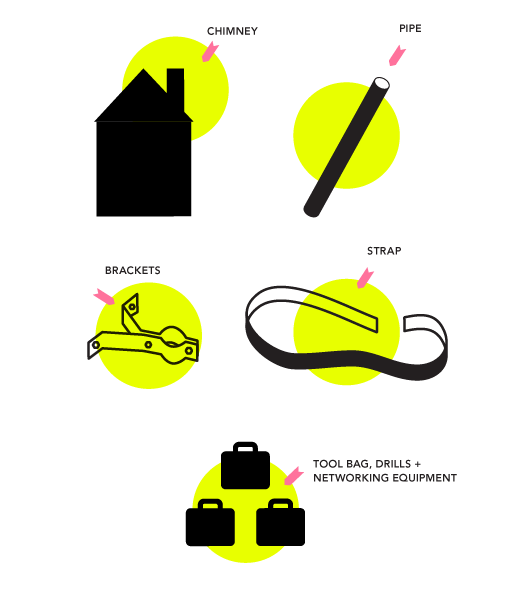
In this module you will find information about different types of hardware for mounting wireless equipment to your rooftop. Use it alongside the Gather Tools and Wireless Equipment module.
Time required: If you are using this document as a teaching guide or for instruction, it will take about an hour to discuss the material.
It is recommended to use these printed materials to accompany a hands-on exploration of the actual hardware. If possible, build the mounting hardware inside, using the instructions that came with various kits.
Materials + Supplies Needed
If you are doing a variety of neighborhood or rooftop installations, it may be worth having a stock of mounting supplies on hand. If you are providing instruction on rooftop installation, you should demonstrate at least one mount of each type. Following is a list of the kinds of kits you can get for rooftop mounting:
Chimney Mount
Anchor Mount
Vent Mount
Roof Edge or Eaves Mount
Non-Penetrating Mount
For resources on where to obtain these kits, skip ahead to the External Resources section. The following sections of this module will include information about materials and supplies needed.
Print this module out to accompany a hands-on exploration of the actual hardware. Deciding on the best mounting hardware depends both on the roof and the hardware in use. Also, working on the roof can be difficult, so it is best to assess the environment first, decide on a mount style, and build the mount before going to the roof using any instructions that come with the mounting hardware.
Types of Roofs
When working on any roof, be very careful. Any slip or slide could lead to a long fall and serious injury or death. If you aren't comfortable working on the roof, don't do it. Get some help - ask around in your community and see if there are any professional roofers, cable TV or phone installers, or other folks that have experience.
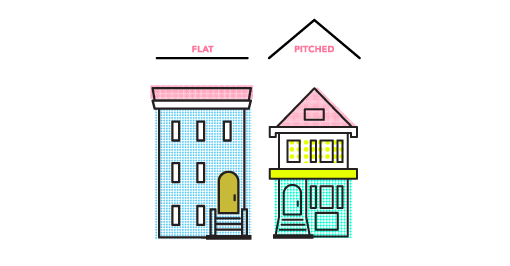
There are two basic kinds of roof: flat and pitched. Pitched roofs are slanted, and in some cases very steeply slanted. Flat or shallow pitched roofs are the best options for rooftop installations, as they provide the safest working conditions and least complicated mounting solutions. In the diagram below, the roofs in the top row are safest, while the bottom two rows are likely to be tricky and dangerous.
With either roof type, you need to take care to maintain the roof coverings and sealants, which protect the roof and make it waterproof. The most important rule when installing something on a roof: never drill any holes in the roof surface itself. Even if the holes are sealed properly, they will eventually leak, and lead to problems in the long run.

Chimney Mount
These are the pieces that you will need to build a Chimney Mount.
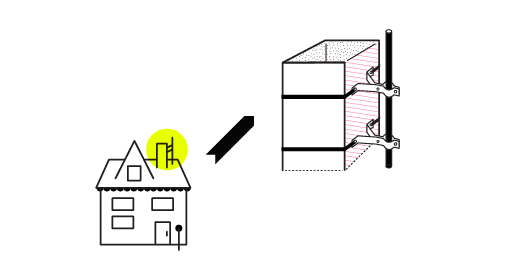
Strap mounting onto a chimney is best whenever drilling into the building is not an option, for example older structures where the brick is softer. Strap mounts use steel straps wrapped around the chimney, which are tightened with a wrench to secure brackets for a pole. Usually these must be ordered online.
Normally kits for strap mounting only include the parts for the straps themselves. You will also need something to affix the router to, such as a piece of electrical conduit, a pipe or a mast. A local hardware store should be able to help with this.
When there is a tall chimney on the roof, you can mount a pole, mast or pipe to the roof using one of two methods: drilling anchors to hold a pipe into the chimney, or using a strap mount. It is up to you if you want to drill holes in your chimney.
These will generally work on either flat or pitched roofs.
Use two strap and bracket sets, as one isn't strong enough to hold the mast. Once the straps are wrapped around the chimney and tightened, the mast can be attached to the bracket, and the wireless router can be attached to the mast.
If your chimney is missing bricks, mortar, or does not look to be in good shape, please do not mount anything to it!
Anchor Mount
Anchor mounts are another way to attach equipment to a chimney, but you can also use them on any masonry wall. The typical anchor mount is made up of two V-shaped pieces of metal which you attach with screws and anchors.
Anchor mounting kits are sometimes available at local hardware or electronics stores as well as online. Normally these kits only include the parts for the anchor. You will also need something to attach the router to, such as a piece of electrical conduit, a pipe or a mast. A local hardware store should be able to help with this. You will only need about 4 to 5 feet of mast, but make sure it is painted or galvanized so it does not rust.
You must be able to drill holes into the chimney or wall to use this method, and you should place plastic or lead sleeve anchors in the holes (lead sleeve anchors are preferrable as they are less likely to slip out of the drilled holes). Sets of these are usually available from the hardware store. You can then screw in the mounting brackets, and the anchors will hold them in the brick. Use two brackets, as just one isn't strong enough. Attach the pipe or mast to the brackets, and attach the wireless router to the pipe.
Use two brackets, spaced about 10-12 inches apart, to fasten your mount to the chimney or wall.
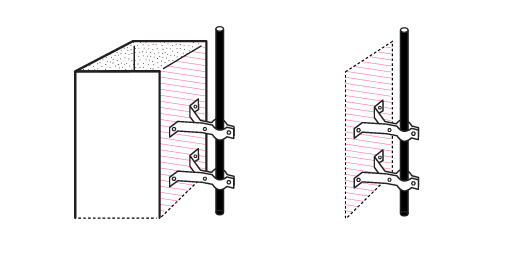
Vent Mount
These are the pieces that you will need to build a Vent Mount.
When there is a sturdy vent stack pipe coming out of the roof, you can mount a mast to it to extend the height. There are various kinds of mounts, but they are all essentially made up of two pieces of metal which bolt around the vent stack and your mast to attach them firmly together. Vent mounting kits are sometimes available at local hardware or electronics stores as well as online. Normally kits for vent mounting only include the parts for the anchor to the vent. You will also need something to attach the router to, such as a piece of electrical conduit, a pipe or a mast.
It is important to note that you should only mount to a metal vent stack. A plastic or PVC vent is too weak to hold a mast - over time the wind will shake the mast and cause the plastic vent to crack. The vent also needs to extend at least a foot out of the roof if you are using a mast 4 feet or more in length. This allows for two brackets to be spaced 10" to 12" apart on the mast (if your mast is only a foot or two long, you might be able to get away with a single bracket).
Use two brackets, spaced about 10-12 inches apart, to fasten your mount to the chimney or wall.
Roof Edge or Eaves Attachment
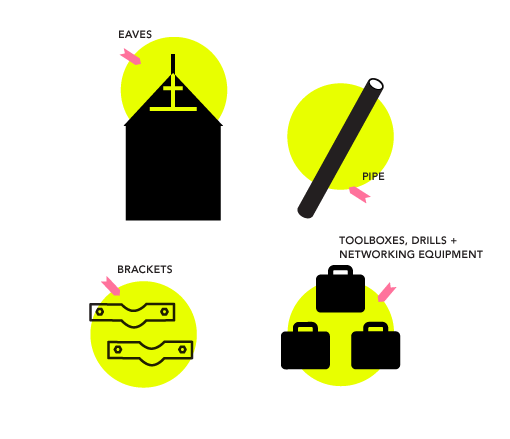
These are placed at the end of a pitched roof, where other methods won't work. They won't work on flat roofs, which usually don't have eaves. Eaves mounts must be drilled into the wood supports of the roof. You can find various kits with different lengths of bottom supports, but look for adjustable models which can stretch out to best fit your roof.
As in all of these installations, a galvanized or painted antenna mast is required.
Since you are mounting this to the trim boards along the edge of your roof, make sure they are in good shape. Rotten wood won't hold up well and the mount may fall out or further damage your roof in high winds. There should be about one foot between the top attachment and the bottom support in order to properly brace an antenna mast. This method isn't recommended for very long masts, but masts up to 4 or 5 feet should be fine.
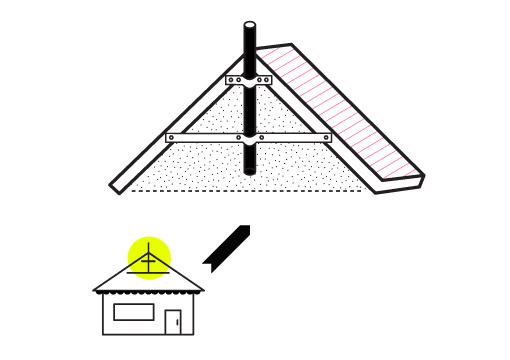
Non-Penetrating Mount
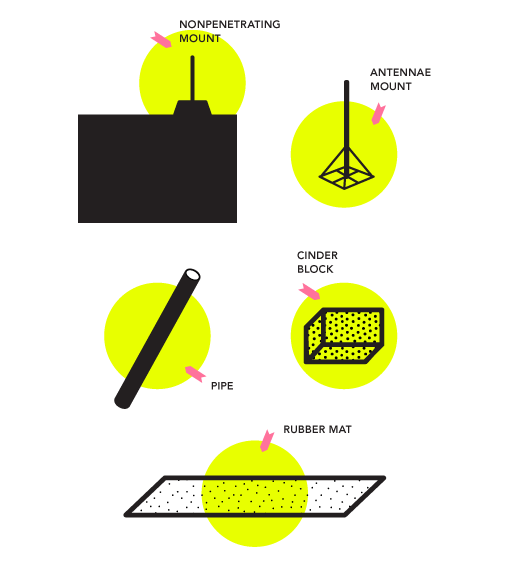
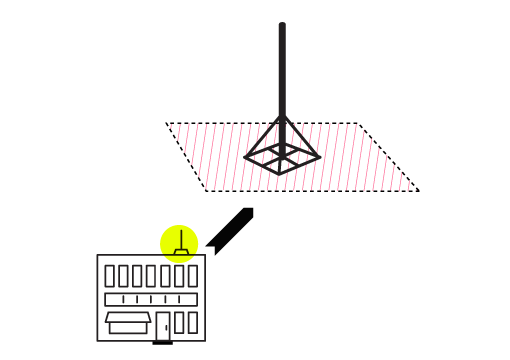
This type of mounting method uses weight to secure a mast to the roof - there is no drilling or bolting required. These are generally the preferred method if you don't have a chimney or vent to mount to, but they can be used even if you do have those available.
Non-penetrating weighted mount supports are available from a number of sources, such as hardware and electronics stores.
The type of mount shown in the diagram is only to be used for flat roofs. There are also non-penetrating mounts for pitched roofs - they mount at the peak of the roof and have a flap that fits on each side of the roof.
Whichever non-penetrating hardware is used, you must do the following:
Use a rubber mat underneath the mount. This is to protect the roof from damage.
Use concrete blocks or some other weight to hold it in place. It might seem sturdy without them, but wind is a powerful thing.
As a home or building owner, use whichever kind of mount you are most comfortable with. If you are not sure, ask around your neighborhood. See what your neighbors use to mount their satellite dishes, TV antennas, or wireless equipment. Maybe they can help you install it as well.
Also, keep in mind there might already be something on your roof that you could use to mount a wireless router to. Generally a pipe or antenna mast should be around 11⁄2" in diameter to best fit the equipment. If you can get to the existing mount safely, use it.

Definitions
- Eaves
- the overhanging lower edge of a roof.
External Resources
There are many sources for outdoor and rooftop mounting hardware. Check your local hardware store, electronics distributor, or electronics store first for mounting kits. If the necessary parts or hardware are not available, it may be necessary to order the equipment from online stores.
If searching for mounting hardware online, we recommend the following terms or part numbers, though the part numbers may change:
- Chimney Mount: Search for "chimney mount," "Winegard CM-2012," "Channel Master CM-3080," or "Ronard 1212"
- Anchor Mount: Search for "antenna mount," "Winegard WM-2040," "Channel Master CM-9034," or "Winegard DS-2000"
- Vent Mount: Search for "vent stack mount," "Channel Master CM-9001," or "GC 8799"
- Roof Edge or Eaves Mount: Search for "eaves mount," "Winegard SW-0012," or "Channel Master CM-9030"
- Non-Penetrating Mount: Search for "non-penetrating roof mount," "VMP FRM-125," "Perfect Vision NPR6B," or "NPR-18C3." Order a rubber mat to protect the roof under the non-penetrating mounting hardware as well - search for: "non-penetrating roof mount mat," or "NPRMAT8"