

Introduction
Using these activities you will learn how to build a flexible and mobile mesh network across several square blocks using battery-powered routers carried in backpacks.
Mesh routing allows a network to shift and transform with the movements of people carrying battery-powered routes creating a highly resilient temporary infrastructure that can distribute Internet access throughout an area or support local area communications and data sharing.
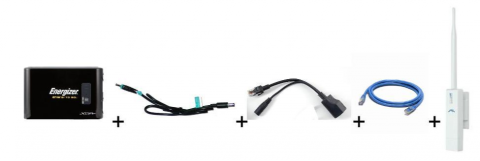
In these activities we use Ubiquiti omnidirectional PicoStation M2 routers running Commotion and Energizer XP8000 battery packs. These battery packs are compact and are able to provide 3 to 4 hours of power to the routers but any battery pack that meets the power requirements of the router would suffice. For example the PicoStations can run on voltages from 15 to 24 volts and these battery packs supply 20 volts. Refer to the voltage markings on your router's power supply before choosing a battery.
There are many exercises you could do--these are just a few examples. If you come up with other fun exercises please send us feedback</a>!
MATERIALS + SUPPLIES NEEDED
Map of the activity area
Several PicoStation routers with Commotion installed
For each router you will need:
- Battery pack
- Power cable
- Passive PoE injector cable
- Ethernet cable
Smartphones to monitor and test the network
Fing or other smartphone ping application (optional)
The Energizers XP8000 battery packs take approximately 4 hours to charge
Steps to Connect the Equipment
Steps:
- Connect the power cable to the 16-20V output port on the Energizer battery pack.
- Plug in the other end of the power cable into the PoE injector cable.
- Plug in one end of the Ethernet cable to the other end of the PoE injector cable. The PoE injector combines power and data on the same line.
- Now plug in the other end of the Ethernet cable to the PicoStation's main port.
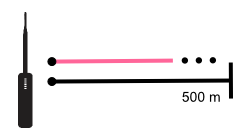
Ubiquiti estimates that PicoStations can cover up to 500 meters but every environment has different properties that impact wireless signals. In our experiments we have been able to space routers approximately 300 meters apart.
As with permanent rooftop wireless networks pop-up networks are impacted by buildings vegetation line of sight and other wireless barriers (to learn more about this explore the Wireless Challenges module). Street level networks are also impacted by traffic parked cars crowds of people and small hills.

You probably will not be able to make links around corners at least not very far but you can test that too!
A Few Things that Might be Helpful
Before you begin the experiment make sure the battery-powered routers are meshed together and that everyone is familiar with how to check the network status.
The IP address of the node (using Commotion):
http://192.168.1.20 > Administration > Status > OLSR > Interfaces
Check the network status (using Commotion):
1. Network map: http://192.168.1.20 > Menu > OLSRViz
2. Mesh neighbors: http://192.168.1.20 > Administration > Status > OLSR > Neighbors
3. Signal strength: http://192.168.1.20 > Administration > Network > WiFi (scroll down to Associated Stations)
4. Available gateways: http://192.168.1.20 > Administration > Status > OLSR > SmartGateway
What do the signal strength values indicate?
Signal strength should be between -40dBm and -70dBm. If it is above -40dBm the devices may be too close. If it is below -70dBm then they may be too far apart. We find that the wireless links break at approximately -80dBm.

For reference:
0 dBm = 1 mW**
-10 dBm = 0.1 mW
-20 dBm = 0.01 mW
-30 dBm = 0.001 mW
** mW stands for milliwatts or 1/1000 of one Watt a unit of power
So as the signal gets weaker the dBm numbers will go down the negative scale.
To see the signal strength between your node and your neighbors (if you are using Commotion):
http://192.168.1.20 > Administration > Network > WiFi and scroll down to the bottom of the page under Associated Stations.
What do the ETX (Expected Transmission Count) values indicate?
ETX is the number of times a packet must be sent for it to be received without error at the destination. This can be used as an estimate of the Mesh Link quality.

Perfect connection: ETX of 1.0
Good performance: Between 1.0 and 2.0
Acceptable but slow connections: Between 2.0 and 3.0
Bad performance: Above 3.0
To see the ETX values on the network (if you are using Commotion):
http://192.168.1.20 > Menu > OLSRViz
Activity: Distance between Two Nodes

Steps:
- Before you begin the experiment make sure the two battery-powered routers are meshed together and that everyone is familiar with the OLSR Visualizer (OSLR-Viz) interface and the Network Neighbors List.
- You will need a street or empty space that is at least 300 to 500 meters so that you can get enough space between the two routers.
- Take the two battery-powered routers and begin walking in opposite directions (or leave one person on a corner and the other person can begin walking away).
- As you walk use the Network Visualizer to observe the link quality changing. Point your smartphone browser to http://192.168.1.20 > Menu > OLSRViz. The visualizer shows the ETX values of the links.
- Go to the Network Neighbors list to monitor the signal strength.
- You can also use Fing (or a similar application on a smartphone) to monitor ping times to the other node.
- Once you reach a point where network performance becomes poor record your positions. You can use a map or GPS to figure the distance you were able to cover. Network performance can be measured in many ways but when ETX values are 2.5 or 3 the network may not perform very well.
- See how far you can walk before the connection between the nodes breaks.
Optionally:
- Add an Internet gateway to the network and observe the usability of the network connection as you move further away.
- Use the network as you normally would to get a sense for the user experience on the network. You could load web pages update social media and/or make a VOIP call.
- Monitor ping times using Fing (or similar application).
Repeat this exercise in different streets and answer these questions:
- What distance were the routers able to cover?
- How is the link impacted by traffic, parked cars, vegetation and crowding?
- Are there other factors that impacted the test?
Activity: Expand the Network

To expand the network along streets:
- Determine how you will communicate across the network. This might be as simple as recording everyone's phone number. However you may want to use a local server running chat (for exampleMediaGrid). Or use a peer-to-peer application like Serval.
- Start as a group and walking down the street leave one person carrying a router on each street corner where you can maintain a good network connection to the previous node.
- Continue down the street leaving a person behind at each location.
- Each person should record ETX values signal strength and ping timesas in the first exercise.
- When the final person has reached the last position that person can return collecting everyone else.
- Regroup and map the results.
Activity: Build a Dynamic Network

When everyone is moving around coordination is very challenging. Here are some suggestions:
- On a map draw the planned positions and movements of each individual and router.
- Begin by stationing a few people on different corners to maintain a constant backbone for the network.
- Before you set out everyone should write down the IP address of every router the name (or identifier) of the person carrying the router and a copy or photo of the map.
- As with the previous activity determine how you will communicate across the network. This might be as simple as recording everyone's phone number. Or you may want to use a local server running chat (for example MediaGrid). Or use a peer-to-peer application like Serval.
- Everyone moving around will need to record their position and their network status at the specified times. You could do this by writing down the network stats or taking screenshots of the OLSR-Viz map at strategic points.
- Regroup and map the results.
Example Networks
Example 1: Local Servers

Disconnected from the Internet this network allows for local data sharing collaboration and communication within the area.
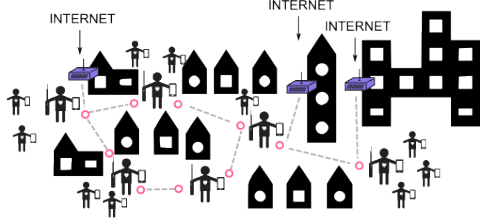
Example 2: Single Internet Connection
This network accesses the internet through two long-distance links back to an Internet gateway. Having two links makes the network more stable.
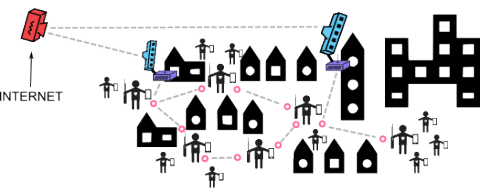
Example 3: Multiple Internet Connections
In this example several Internet gateways inside nearby buildings are set up to share internet with the rest of the network.
Definitions
- ETX
- The number of times a packet must be sent for it to be received without error at the destination.
- Signal Strength
- The amplitude or power of a wireless signal at a receiving device such as an FM radio or WiFi card.